
You just finished designing a set of brand assets for your online shop. Sixteen transparent PNGs — logos in three sizes, a few corner badges, a couple of sticker designs. They look perfect in Figma. You export them as PNG with transparency enabled, drop the folder onto your desktop, and check the combined size: 2.4 MB. For sixteen small graphics. On mobile, that is two seconds of load time before anything else on the page even starts.
So you run them through a compressor. The file sizes drop dramatically — great. But then you upload one of the compressed versions to your shop page and notice something off around the edges of your logo. A thin white line where there used to be a smooth fade. Or tiny jagged steps along a curved border. That is the transparent-PNG compression trap, and almost nobody talks about it because most compression tools hide the problem behind a "before/after" preview that is too small to see it. I am going to show you exactly what happens under the hood, give you real numbers, and tell you which approach works for which kind of asset.
The numbers: a real transparent logo, three compression paths
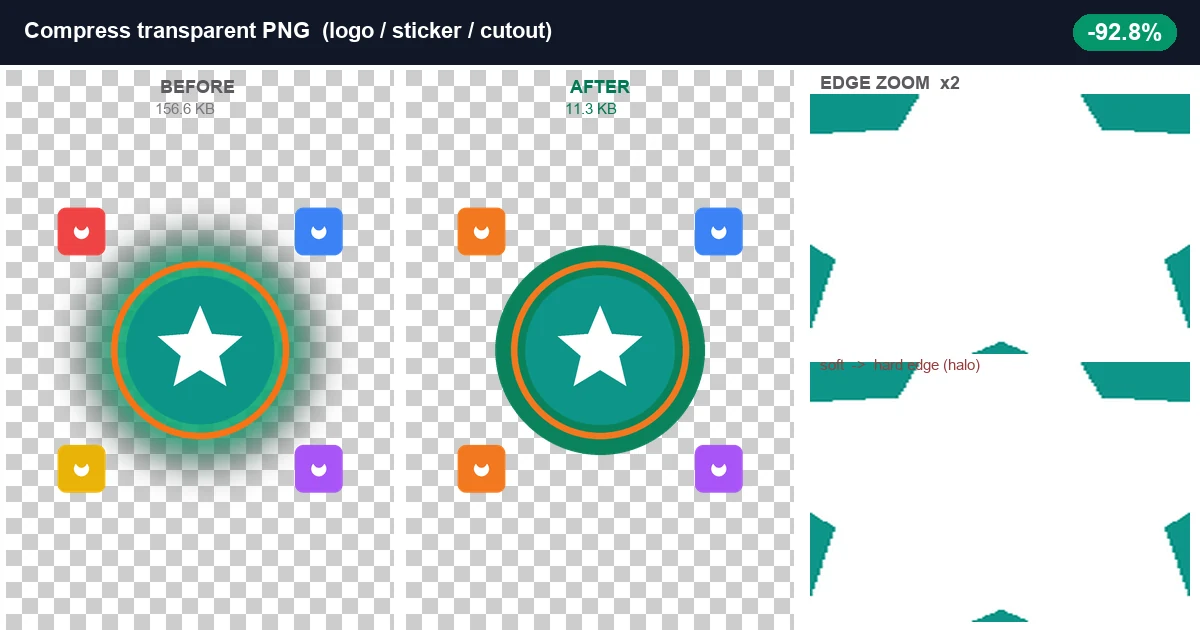
I built a test image specifically for this: a 1200×1200 pixel composition with a central logo badge, a feathered glow (soft radial alpha), and several hard-edged corner stickers. It uses RGBA — four channels instead of three — so every pixel carries red, green, blue, and opacity. I ran it through three paths and measured everything:
| Method | File size | Savings | Soft alpha preserved? |
|---|---|---|---|
| Original (unoptimized RGBA) | 156.6 KB | — | Yes — 649,298 partial-alpha pixels |
| Lossless re-encode (optimize only) | 126.0 KB | −19.6% | Yes, identical pixels |
| PNG8 quantized (256 colors, 1-bit alpha) | 11.3 KB | −92.8% | No — zero partial-alpha pixels |
What PNG8 actually does (and why it wrecks soft edges)
PNG8 means indexed-color PNG. Instead of storing a separate red-green-blue value for every single pixel, the encoder builds a palette — up to 256 colors total — and then each pixel is just a number pointing to a palette entry. This is dramatically smaller because one byte per pixel replaces three (or four with alpha).
The catch comes down to how PNG8 stores transparency. In an indexed PNG, each palette entry gets a single transparency value. Most encoders round that to either fully transparent or fully opaque — there is no room for "37% see-through." Every pixel that was semi-transparent (anti-aliased edges, drop shadows, glows, gradient fades) snaps to one extreme or the other.
In my test image, the original had 649,298 pixels with intermediate alpha values — that is the entire soft glow plus the anti-aliasing around the circle and star. After PNG8 conversion using the same engine our website uses (upng-js with median-cut quantization, rounding alpha to 1-bit), that number dropped to exactly zero. Every one of those 649 thousand pixels became either 255 (opaque) or 0 (transparent). Visually, that is the halo you see in the middle panel above: a hard ring where the glow used to fade out gently.
Does this matter? It completely depends on what is inside your transparent PNG.
When PNG8 is perfectly safe (use it aggressively)
If your transparent image contains only hard-edged shapes — solid-color logos, flat icons, square or rounded-rectangle stickers, product cutouts photographed against a pure-white background — PNG8 is essentially free money. The alpha channel has nothing soft to ruin, and you get 90%+ size reduction with zero visual change.
- Brand logos exported from Illustrator/Figma as flat vector exports. No glow, no drop shadow, no blur. These compress to PNG8 beautifully. My corner-sticker elements in the test image are proof — they look identical before and after.
- Product cutouts (white-background e-commerce photos with the background removed). The edge between product and transparency is typically a clean mask from Photoshop's pen tool or a magic-wand selection. Hard edge, no fade. Safe for PNG8.
- UI icon sets, emoji-style graphics, pixel-art game assets. All hard-edged by design. PNG8 was practically invented for these.
- Print-on-demand sticker designs. Most POD platforms want a simple transparent PNG with a solid shape. No effects. PNG8 cuts the upload size from hundreds of KB to under 15 KB, which matters when you are managing dozens of designs.
When PNG8 will bite you (avoid or work around it)
- Logos with drop shadows, glows, or outer blurs. These rely on smooth alpha gradients. PNG8 turns those gradients into concentric hard rings. At normal viewing size (200–400 px wide on a phone) you might not notice. At full resolution or on Retina screens, the halo is obvious.
- Anti-aliased text rendered as transparent PNG. Small font sizes (under 24 px) use subpixel anti-aliasing that creates many partial-alpha pixels along character edges. PNG8 makes text look jagged or slightly thicker/thinner depending on the threshold. If your logo contains readable text, inspect carefully after compression.
- Watermarks or overlay graphics with varying opacity (like a "50% transparent" stamp). PNG8 collapses all intermediate values. Your watermark becomes either fully visible or invisible — no middle ground.
If your asset falls into this category, you have three options:
- Flatten the effect first. Merge the glow/shadow layer onto a solid background color, then export as non-transparent PNG or JPEG. Now you have no alpha to wreck. Compress normally. This is what most professional designers do for final production assets.
- Use lossless optimization only. Skip PNG8. Run the file through a lossless PNG optimizer (OxiPNG, zopfli) which re-encodes the deflate stream more efficiently without touching pixel values. You will save maybe 15–25% instead of 93%, but every pixel stays exactly as designed. Good enough for hero images and header logos where quality is non-negotiable.
- Accept it and verify at display size. Compress as PNG8, download the result, open it side-by-side with the original at the actual size it will appear on your webpage (not zoomed in). If the halo is invisible at 1:1, ship it. Most users view logos at 80–200 px wide where a 2-pixel halo is below perception. Just do not assume — check.
Batch workflow: compress 20 transparent PNGs at once
Once you know which method fits each asset, the actual compression step takes about ten seconds. Here is the workflow I use:
- Gather your transparent PNGs. Put them all in one folder. Mix of logos, stickers, cutouts — whatever needs shrinking.
- Check each one quickly at 200% zoom. Look for any soft edges, glows, or faded areas near the shape boundaries. Sort into two piles: "hard edges only" and "has soft alpha."
- Drop the whole batch into a browser-based compressor. The tool I use accepts up to 20 files at once, runs entirely in your browser (nothing uploads to a server), and automatically detects the format. Upload all 20 in one drag-and-drop.
- Let the engine run PNG8. For the hard-edge pile, the default output is already optimal. For the soft-alpha pile, preview each result at 1:1 before deciding whether to keep it or switch to lossless mode.
- Download the batch. One click downloads everything as individual files. File names stay intact. Drop them straight into your CMS or marketplace uploader.
Total time from folder-open to finished download: roughly 30 seconds for a batch of 20 files. No software installation. No account creation. And critically, your original artwork never left your device — the compression happened locally in your browser tab.
Mistakes that waste hours (I made most of these)
- Converting transparent PNGs to JPEG. This destroys the alpha channel entirely. Your transparent areas fill with white (or black, depending on the tool). JPEG has no concept of transparency. Every platform that expects a transparent logo will reject or misrender it. Keep PNGs as PNGs.
- Not checking for halos before bulk-uploading. You compress 50 logos, feel good about the 90% size win, upload them all to your store, and three days later a customer emails you: "your logo looks broken on my phone." Now you have to redo everything. Spot-check at 1:1 first.
- Using server-side compressors for unreleased assets. Your pre-launch branding materials travel to someone else's server. Browser-side tools avoid this entirely — the file never leaves your machine. Given that some sellers work with trademarked logos or unreleased seasonal designs, this privacy point is worth caring about.
- Assuming all PNGs behave the same. A screenshot saved as PNG compresses great with PNG8 (it is mostly flat colors). A photo saved as PNG is already wrong (should be JPEG). A transparent logo with a glow is a third category with its own rules. Match the method to the content type.
- Over-quantizing to 64 or fewer colors. Going from 256 colors to 128 or 64 barely saves additional bytes (my test showed 11.3 KB at all three levels — the palette was already small enough at 256). But visual quality degrades noticeably: banding appears in gradients, colors shift. Stick to 256 unless you need to hit a very specific size target under 10 KB.
Related guides for specific situations
Your transparent-PNG needs might connect to other image tasks. These guides cover the adjacent topics in depth:
- Compressing product photographs (JPEG quality settings, platform requirements, keeping zoom intact)? Read the product photo compression guide.
- General PNG compression without worrying about transparency (screenshots, documents, flat graphics)? The PNG compression walkthrough covers the basics.
- Dealing with screenshots that blur when saved as JPEG? The screenshot guide explains why PNG8 keeps text sharp.
- Understanding JPEG quality levels in detail? The JPEG quality deep-dive compares q50 through q95 across different image types.
- Shrinking images for email attachments? The email compression guide walks through batch workflows for any format.
The bottom line
Transparent PNGs are oversized because RGBA adds a fourth channel and most design tools export them unoptimized. PNG8 compression (median-cut palette quantization with 1-bit alpha) can shrink them by 90%+ in a browser tab with zero software installs. The only thing you need to watch for is soft alpha — glows, drop shadows, anti-aliased text — which PNG8 converts to hard edges. If your assets have none of those, compress away without hesitation. If they do, flatten the effect, use lossless mode, or verify at display size that the halo is invisible.
Your logo deserves to look sharp on every screen. It also deserves to load fast. Both goals are achievable — you just need to pick the right compression path for the specific asset you are holding.